sábado, 6 de julio de 2013

PAY DE QUESO/CHEESE PIE

Este pay de queso es sumamente sencillo de hacer y queda delicioso! a todos les encantara! Yo compro las bases ya hechas para ahorrar tiempo y creeme que si valen la pena porque estan deliciosas.

This cheese pie is soooo easy to make and everyone will love it, I can guarantee you that. I buy the pre-made cracker crust, and believe me it no only helps you save time on the preparation, they also taste great!

 
INGREDIENTES (para hacer 2 pays):

- 2 bases para pay
- 1 lata de leche evapoarada
- 1 lata de leche condensada
- 6 huevos grandes (o 5 huevos medianos)
- 1 paquete de queso crema de 190gr
- 1 cucharadita extracto de vainilla

INGREDIENTS (this makes 2 pies):
- 2 pre-made cracker crusts
- 1 can evaporated milk
- 1 can condensed milk
- 6 large eggs or (5 medium eggs)
- 1 package cream cheese (190gr)
- 1 tsp vanilla extract
 
PROCEDIMIENTO:
1- Precalienta el horno a 180° C
2- Licuar los huevos, el queso, el extracto de vainilla y las 2 latas de leche. Es todo! asi o mas facil?
3- Vaciar esto en las 2 bases para pay.
 
PREPARATION:
1- Preheat oven to 350°F
2- Blend the eggs, cream cheese, vanilla extract and the 2 cans of milk. Thats it! Can it get any easier than that???
3- Pour this blended mixture on your 2 pie crusts.
 
 
4- Hornea a 180°C durante 45 -55 mins.
 
4- Bake at 350°F for 45 - 55 mins.
 
 
5- Deja que se enfrien y luego refrigeras. Disfrutalos bien frios!
 
5- Cool to room temperature. Refrigerate for a 2-3 hours. Enjoy!

miércoles, 26 de junio de 2013

CHILAQUILES VERDES / GREEN CHILAQUILES

Los chilaquiles son un platillo tradicional Mexicano a base de tortillas cortadas en pequeños triángulos y bañadas con diversas salsas (que en esta ocasion sera una salsa verde). se pueden acompañar de carne, pollo deshebrado, huevos o simplemente con queso y frijoles.

Chilaquiles are a traditional Mexican dish. Chilaquiles are basically corn tortilla pieces that are fried, cooked in salsa (in this recipe we'll be using green salsa) and sprinkled with cheese. They can be eaten as a main dish, like I mentioned, just sprinkled with cheese, or as a side dish accompanied by steak, shredded chicken breast, or eggs.

¿Has notado que la salsa verde siempre tiene un sabor amargo/acido? si verdad. pero ¿porque? bueno, esto es por los tomates, ellos nos dan ese saborcito acido, lo cual es perfectamente normal, pero ¿que debemos hacer para que no queden con ese saborcito acido? muy facil... ya veras el ingrediente secreto para lograr esto.

Have you done green salsa before? If so, you've probably noticed a sour/acid flavor to it. But why? This acid flavor is caused by the green tomatoes, and its perfectly normal... but how do we get rid of that acidity? With a very simple (and secret) ingredient... you'll see.

INGREDIENTES:
- 1/2  kilo de tortillas
-  8 tomates verdes
- 1-2 chiles jalapeño (depende que tan
   picosos te gusten)
- 1 pequeña rebanada de cebolla
- 1 diente de ajo
- cilantro (opcional)
- sal o un cubo de consome de pollo
- aceite para freir

- crema
- queso
- bistek o pollo deshebrado para acompañar los chilaquiles


INGREDIENTS:
- 1/2 kg of tortillas (aprox 20 tortillas) It will help for the frying if your tortillas are a little dry (leave  them out overnight to dry out a bit)
- 8 green tomatoes
- 1 or 2 jalapeño chilis (depends on how HOT you want them)
- a small slice of onion
- 1 garlic clove
- some coriander leaves (cilantro) - optional
- salt or a chicken bouillion cube
- oil for frying


GARNISHES:
- cream
- cheese 
- steak or shredded chicken breast (to accompany your chilaquiles)


y.. el ingrediente secreto:

and.. the secret ingredient:


* una piza de bicarbonato de sodio

* a quarter teaspoon of baking soda


PROCEDIMIENTO:                        PREPARATION METHOD:

1-  Cortar todas las tortillas en 4 triangulos.
1- Cut all your tortillas into 4's (as to make 4 triangles)


2- Freir esos triangulos en pequeñas porciones a la vez.
2- fry those tortilla triangles in small bunches at a time.
 
3- Ten cuidado que no queden muy doradas (muy cafes) porque van a saber amargo (como puedes ver en la siguiente imagen, asi deben quedar. no muy claros y tampoco muy obscuros)
3- Make sure they dont get too brown, otherwise your chilaquiles wont taste good (they'll be sour). as you can see in the next picture, those tortilla chips are just perfect (noot too light and not too dark)

 
4- pon tus totopos (las tortillitas fritas) encima de unas servilletas para que absorban el aceite.
4- place your tortilla chips on paper towel to absorb the excess oil.
Para hacer la salsa verde:
Now lets make the green salsa:


5- pon un poco de agua en la icuadora.
5. fill about a quarter part of your blender with water

6- hechar los tomates, chiles jalapeño, cebolla, ajo, sal, cilantro.. y el bicarbonato. Licuar.
6- Add the following ingredientes to your blender: the green tomatoes, jalapeño chilis, garlic clove, onion, salt, cilantro... and the baking soda. Blend.


7- OPCIONAL: Freir una pequeña rebanada de cebolla en una cacerola si no te gusta mucho la cebolla, entonces solo calienta un poco de aceite en la cacerola.
7- OPTIONAL: Fry a small piece of onion until golden brown in a large saucepan. If you dont really like onions, then just heat up some oil .
 
8- Ya que este doradita la cebolla (si no usaste cebolla entonces ya que este bien caliente el aceite) agregas la salsa verde.
8- Once the onion is golden brown (If you didnt use onion, then once the oil is hot) add the green salsa to your pan.
 
9- Cocer por unos minutos. Prueba si no le falta sal (a mi me gusta mas usar el cubo de consome de pollo). retira la cebolla.

9- Cook for a couple of minutes. taste to see if you need more salt (I prefer a chicken bouillon cube instead of salt). Remove the onion pieces.


 10- hecha los totopos a la salsa verde. Y revuelve suavemente para no quebrar los totopos.
10- add the fried tortilla chips to the salsa. mix carefully as to not break the chips.

Hay 2 maneras de dejar los chilaquiles:
1- Bien remojados en la salsa (personalmente, asi es como me gustan a mi).Para que queden asi, tapalos por unos 5 -10 minutos con la estufa apagada, para que se remojen bien
2- Crujientes - para que queden crujientes, solo dejalos en la salsa unos minutos, y enseguida sirve.

There are 2 options for making them:
1- Really soaked/soft chilaquiles (this is how I prefer them). To make them like this, cover your sauce pan and leave covered (flame turned off) for 5-10 minutes.
2- Crunchy chilaquiles - To get crunchy cilaquiles, dont soak them for too long in the salsa. Only a couple of minutes and do not cover your saucepan, and serve right away.
Aqui los tape para dejarlos blanditos.
I covered mine because I prefer them soft.


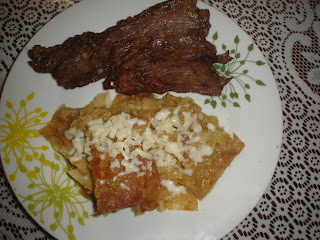
yo los acompañe con un bistek.
I served mine with cheese on top and a steak.
 
 
 Aqui les dejo imagenes que haye en la red de otras opciones para sus chilaquiles verdes:
 
 leave you guys other options I found on the web for your green chilaquiles:


martes, 25 de junio de 2013

POSTRES/DESSERTS

GELATINA DE ZANAHORIA, PIÑA Y NUEZ/CARROT, PINEAPPLE & WALNUT GELATIN


GELATINA DE ZANAHORIA, PIÑA Y NUEZ

CARROT, PINEAPPLE AND WALNUT GELATIN
Hoy les enseñare a hacer la gelatina de zanahoria, piña y nuez.
Cuando piensas en zanahoria, definitivamente no piensas en una gelatina, porque suena muy raro una gelatina de zanahoria, bueno al menos eso fue lo que yo pense cuando supe de esta gelatina... pero la probe y creanme: que delicia!!!
Es muy facil de hacer y aparte de deliciosa es super nutrivita ya que contiene muchas vitaminas, por ejemplo:

  • Vitamina A de la zanahoria
  • Vitamina C de la piña
  • Vitamina A, E, B1, B6 de las nueces
  • Calcio, vitamina A y vitamina D de la leche
Today I will show you guys how to make carrot, pineapple and walnut gelatin.
Yes, I know. When you think of carrots, gelatin is definately not the first (or last) thing that comes to your mind. carrots in a gelatin??? are you kidding me? Well, that was my first reaction when I came upon this jello, BUT I tried it out and boy was I surprised! all I can say now is you definately gotta try it!
Its such a delicious AND NUTRICIOUS dessert. Let me tell you the great vitamins you will get from this yummy dessert:
  • Vitamine A from carrots
  • Vitamine C from the pineapple
  • Vitamins A, E, B1 and B6 from walnuts
  • Calcium, vitamins A and D from milk.

ESTA ES LA DELICIOSA GELATINA. A CONTINUACION LA RECETA PARA HACER ESTE DELICIOSO Y NUTRITIVO POSTRE.

THIS IS THE GELATIN. DOESN'T IT LOOK GREAT? WELL.. LET ME TELL YOU, IT TASTES EVEN BETTER! SO, LETS GET STARTED:


INGREDIENTES:

- 2 latas de leche evaporada
- 1 lata de leche condensada
- 1 lata de media crema
- 1 taza de piña en almibar (sin el almibar)
- 1 taza de agua a temperatura ambiente
- 4 sobres de grenetina (7gr cada uno)
- media taza de nueces
- 2 zanahorias

- unas mitades de nueces para adornar.
Con estas cantidades te sale una gelatina enorme, o 2 gelatinas de tamaño normal, asi que como podran ver en la imagen, yo use la MITAD de las cantidades de estos ingredientes porque solo queria hacer una gelatina tamaño "normal"
INGREDIENTS:

- 2 cans of Evaporated milk
- 1 can of sweetened condensed milk
- 1 can half & half cream (aprox. 225gr)
- 1 cup canned pineapple slices or chunks
- 1 cup of lukewarm water (room temperature)
- 4 envelopes of Unflavored gelatin (7 grams each envelope; 28 grams total)
- half cup of walnut pieces
- 2 medium sized carrots
- some walnut halves for decoration.

NOTE: With these quantities, you will have one big gelatin, or 2 medium sized gelatins. As you can see on the ingredients image, I used HALF the ingredients because I made one "normal" size gelatin.

Tambien ocuparemos un molde para gelatina.
You will also be needing a nice gelatin mold


PROCEDIMIENTO:                          PREPARATION METHOD:
    1- Pelar y rallar las zanahorias (aqui es una zanahoria y media)
    1- Peel and shred carrots. (like I said before, I used half of the ingredients so, in this image I have peeled and shredded one and a half carrots)

    2- escurrir la piña y cortar en trozos pequeños
    2- Drain your pineapple chunks (if you bought the sliced ones, drain them and cut them into small chunks)

    3- picar las nueces. hechar estos 3 ingredientes en tu molde.
    3- Place the shredded carrots, pineapple chunks and walnut pieces into your gelatine mold.


    4- Revolverlos un poco
    4- And mix these 3 ingredients.

    5- Hidratar la grenetina: hechar los sobres de grenetina en el agua fria.
    5. We need to hydrate our unflavored gelatin, so combine it in the lukewarm water and give it a small mix with a fork.

    6- Deja la grenetina reposar unos 5 mins. (se hace espesita). ya despues la tenemos que hacer liquida.
    6- Set aside for aproximately 5 minutes. (the gelatin granules will puff up a little and most of the water will be absorbed)

    7- La hacemos liquida disolviendola:
    a)  ya sea en baño maria (como puedes ver en la primera imagen), o mas facil:
    b)- Yo la meti al microondas (hay que ser practicos) unos 5 segundos, revolvi y volvi a meter otros 5 segundos... y asi hasta que quede liquida...
    Asi debe quedar:

    7- Now you need to completely dilute those puffed up gelatin granules, there are 2 ways to do that:
    a) - you can do it on the stove: heat up water in a small saucepan (up to halfway in depth) and bring it to a medium simmer. Place your bowl with the puffed up gelatin on top (make sure that the bowl is larger than the head of the saucepan for sure), making a double boiler or water bath, and let it heat up for about 5 minutes, stirring here and there, as you can see in the first image,
    OR
    b) Place your cup with the puffed up gelatin granules in the microwave for 5 seconds, stir, heat for another 5 seconds and stir again... do these 2 steps until the granules become liquid
    as you can see on this 2nd image, thats the consistency we want (like water)
    set aside.

    8- y aparte vamos a licuar las leches: La evaporada
    8- we will blend our 3 canned milks: the evaporated,

    9- La condensada (les recuerdo que yo use la mitad de los ingredientes, asiq ue solo le heche MEDIA lata de esta)
    9- The sweetened condensed milk (like I mentioned earlier, I used HALF the ingredientes, so I only used half of this can)

    10- y la media crema. Licuamos estos 3 ingredientes.
    10- And the Half and Half cream.
    Blend these 3 ingredients.

    11- Mientras se licuan esos 3 ingredientes, SIN APAGAR LA LICUADORA, agrega la grenetina (ya disuelta) por la parted de arriba.
    11- While these are blending and WITHOUT TURNING OFF THE BLENDER, you will add the diluted unflavored gelatine from the top part or your blender and blend for a couple of seconds more. Its now ready

    12- y vaciar encima de la piña/zanahoria/nueces.
    12- Pour this blended milk/gelatine mixture over your carrots/pineapple/nut mixture.

    13- Como podran ver, no se llenó todo el recipiente con la MITAD de los ingredientes. Si hago toda la cantidad de ingredientes, se llena este recipiente, y me sobra para otra pequeña gelatina.
    13- As you can see, with HALF of the ingredients, I didn't fill up this jello mold. If I were to do ALL the ingredients mentioned in the ingredients list, I would fill this mold, and i could make another small gelatin.


    14- tapar y refrigerar aprox 3 - 4 horas
    14- Cover and refrigerate for aproximately 3 to 4 hours.

    Decora con mitades de nuez y... VOILA! ASI QUEDA ESTE DELICIOSO Y NUTRITIVO POSTRE!
    Decorate the top with walnut halves...and... VOILA! THIS IS WHAT YOU GET! ;)


    PLATO FUERTE / MAIN DISH

    Pechugas Cordon Blue/Cordon Bleu chicken